
Latency Test
This test is the first test that should be performed on a PC to see if it is able to drive a CNC machine.
Latency is how long it takes the PC to stop what it is doing and respond to an external request.
The default for Machinekit is to test the SERVO_THREAD.
If you have steppers with software pulse generation, you will need to test the BASE_THREAD too
BASE_THREAD that makes the periodic 'heartbeat' that serves as a timing reference for the step pulses. The lower the latency, the faster you can run the heartbeat, and the faster and smoother the step pulses will be.
Latency is far more important than CPU speed. A lowly Pentium P4 that responds to interrupts within 10 microseconds each and every time can give better results than the latest and fastest i7 Hyperthreading beast.
The CPU isn’t the only factor in determining latency. Motherboards, video cards, USB ports, and a number of other things can hurt the latency. The best way to find out what you are dealing with is to run the RTAI latency test.
Generating step pulses in software has one very big advantage - it’s free. Just about every PC has a parallel port that is capable of outputting step pulses that are generated by the software. However, software step pulses also have some disadvantages:
-
limited maximum step rate
-
jitter in the generated pulses
-
loads the CPU
The best way to find out how well your PC will run Machinekit is to run the HAL latency test. To run the test, open a terminal window
latency-test  ( for just a servo_thread test )

latency-test 25us 1ms  ( for a base and servo thread test )
You should see something like this:
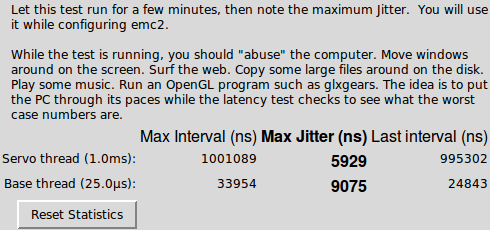
While the test is running, you should 'abuse' the computer. Move windows around on the screen. Surf the web. Copy some large files around on the disk. Play some music. Run an OpenGL program such as glxgears. The idea is to put the PC through its paces while the latency test checks to see what the worst case numbers are.
|
Note
|
Do not run Machinekit or Stepconf while the latency test is running. |
The important numbers are the 'max jitter'. In the example above, that is 9075 nanoseconds, or 9.075 microseconds. Record this number, and enter it in Stepconf when it is requested.
In the example above, latency-test only ran for a few seconds. You should run the test for at least several minutes; sometimes the worst case latency doesn’t happen very often, or only happens when you do some particular action. For instance, one Intel motherboard worked pretty well most of the time, but every 64 seconds it had a very bad 300 us latency. Fortunately that was fixable, see http://wiki.linuxcnc.org/cgi-bin/wiki.pl?FixingSMIIssues
So, what do the results mean? If your Max Jitter number is less than about 15-20 microseconds (15000-20000 nanoseconds), the computer should give very nice results with software stepping. If the max latency is more like 30-50 microseconds, you can still get good results, but your maximum step rate might be a little disappointing, especially if you use microstepping or have very fine pitch leadscrews. If the numbers are 100 us or more (100,000 nanoseconds), then the PC is not a good candidate for software stepping. Numbers over 1 millisecond (1,000,000 nanoseconds) mean the PC is not a good candidate for Machinekit, regardless of whether you use software stepping or not.
Note that if you get high numbers, there may be ways to improve them. Another PC had very bad latency (several milliseconds) when using the onboard video. But a $5 used video card solved the problem.
|
Note
|
Machinekit does not require bleeding edge hardware. |
For more information on stepper tuning see the Stepper Tuning Chapter.
Port Address
For those who build their own hardware, one safeguard against shorting out an on-board parallel port - or even the whole motherboard - is to use an add-on parallel port card. Even if you don’t need the extra layer of safety, a parport card is a good way to add extra I/O lines with Machinekit.
One good PCI parport card is made with the Netmos 9815 chipset. It has good +5V signals, and can come in a single or dual ports.
To find the I/O addresses for these cards open a terminal window and use the list pci command:
lspci -vLook for the entry with "Netmos" in it. Example of a 2-port card:
0000:01:0a.0 Communication controller: \
      Netmos Technology PCI 9815 Multi-I/O Controller (rev 01)
Subsystem: LSI Logic / Symbios Logic 2POS (2 port parallel adapter)
Flags: medium devsel, IRQ 5
I/O ports at b800 [size=8]
I/O ports at bc00 [size=8]
I/O ports at c000 [size=8]
I/O ports at c400 [size=8]
I/O ports at c800 [size=8]
I/O ports at cc00 [size=16]
From experimentation, I’ve found the first port (the on-card port) uses the third address listed (c000), and the second port (the one that attaches with a ribbon cable) uses the first address listed (b800).
You can then open an editor and put the addresses into the appropriate place in your .hal file.
loadrt hal_parport cfg="0x378 0xc000"You must also direct Machinekit to run the 'read' and 'write' functions for the second card. For example,
addf parport.1.read base-thread 1
addf parport.1.write base-thread -1
Please note that your values will differ. The Netmos cards are Plug-N-Play, and might change their settings depending on which slot you put them into, so if you like to \'get under the hood' and re-arrange things, be sure to check these values before you start Machinekit.